Dieses Blog durchsuchen

Samstag, 29. Juni 2013

♥ von Herzen ♥

Hallo liebe Shopblogleser,
ich wünsche Euch einen wunderschönen Samstagmorgen.Schön das Ihr auch heute wieder hier auf dem Shop Blog von Cards und More vorbei schaut. Heute bin ich (Angela) wieder an der Reihe,Euch ein Werk mit den tollen Produkten von Cards und More zu zeigen. Da ich noch eine Geschenkverpackung brauchte habe ich Euch heute mal wieder eine kleine  Box oder Geschenktüte mitgebracht. Die Anleitung ist nicht von mir, sondern ich habe sie hier gefunden.Die Box besteht aus Cardstock und Designpapier von Bildmalarna.Die Ränder der Papiere habe ich mit Distress Walnut Stain eingefärbt.Außerdem habe ich wieder einen Text aus meinem Lieblingsstempelset Kurz notiert von Joy!Crafts verwendet.
Der schöne Schmetterling ist auch eine Stanze von Joy!Crafts(er ist im Moment leider nicht im Shop erhältlich),auch die Vintage Flourishes Blumenblätter Stanze ist von Joy!Crafts.Die kleinen weißen  Perlen sind von Reprint.
Ich sage Danke für Euren Besuch und hoffe meine Box gefällt Euch ein bisschen.Ich wünsche Euch noch einen schönen Samstag bzw. ein schönes Wochenende und schicke Euch ganz liebe Grüße
Angela
 
Folgende Materialien habe ich aus dem Cards und More Shop verwendet:
 
Joy!Crafts Stanzschablone-Vintage Flourishes Blumen 4 6003-0032   REPRINT selbstklebende Halbperlen, weiß, 4mm - 144 Stück  Joy!Crafts Clearstamp Set - KURZ NOTIERT  Distress Ink™ Stempelkissen Walnut Stain


Freitag, 28. Juni 2013

Jolie...

Hello everybody! 

I hope that everybody is well and that you have of weather so beautiful as here in Belgium!

Today, I come to show you a layout!


For this page, I used a paper " Webster Pages ". I stuck it on a wooden plate of 30 x 30 cms. (Thickness 5 mm)

I used the edges of the paper with "Old Distresser" then I inked them with some ink "Distress Tea Dye". I also realized some tears with fingers and I slid or piece of falls of pink paper which I drilled with a puncher "Martha Stewart", or small lace pieces. 

Under the photo, I stuck a white doily which I inked with some ink in spray " Tattered Angels Pink".


Under the photo, I stuck a white doily which I inked with some ink in spray " Tattered Angels ".

I also realized small butterflies with a small puncher and I decorated their center with a young gem round. I just stuck them at the level of their body to be able to fold slightly wings and give them an impression of "to fly".

Under the image, I also added three laces ecru different. Then, I added a piece of ribbon "Seam Blue Baby". I used a small fall of the same ribbon to realize a small bow and I stuck it to the left of the photo.

Just above, I added the title "Jolie". To do it, I used a small wooden word which I covered with "Glitter Stickels Icicle".


For the decoration, I added the following flowers: 

- A big white and pink rose (45 mm).
- A rose blue (30 mm).
- A "Vintage" pink rose (30 mm).
- A white and blue flower of cherry tree. 
- Two cloth rose white. 
- A small pink rose and a cream (10 mm).
- A small turquoise blue rose (8 mm).

In these flowers, I added small branches of leaves realized with "Cuttlebug" and dies " Toga " as well as small leaves realized with a small puncher.

Flowers are then covered with some touches of "Glitter Stickels Icicle" also to give of the shine to the set.


Below, to the right of the photo, I created another set containing flowers:

- A big light blue rose (" Prima Marketing ").
- A pink rose 2 tones (30 mm).
- A light pink rose (30 mm).
- Cloth white roses. 
- A rose ecru (20 mm).
- A white carnation. 
- A white and blue flower of cherry tree. 
- A pink daisy and a cream. 
- A light pink lilidaft. 
- A white rose (15 mm).

Over, I added a piece of ribbon of white pearly pearls.


I thank you for your passage on the blog of the shop

I wish you all an excellent weekend! 


You can find following products in the shop:


    adhésif double face - 9 mm x 13 m  Stickles Glitter Glue IcicleTim Holtz distresser de papier et coupe-fil  Distress Ink™ Stempelkissen Tea Dye Distress Ink™ Stempelkissen Walnut Stain     Doilys de papier, rondes, 10 pcs - ø 11,5 cm 

Dienstag, 25. Juni 2013

Reise/Abenteuer bei der Cards und More Challenge


Huhu Ihr Lieben,

heute startet eine neue Challenge bei Cards und More - außerdem habe ich parallel meinen Beitrag für den Cards und More Shopblog kreiert, um Euch wieder ein paar Leckerbissen aus dem Cards und More Onlineshop zu zeigen.

Nun komme ich aber erstmal zum Challengethema. Wir möchten alles zum Thema 


 sehen - und ich wollt es nicht so typisch sommerlich machen - außerdem hatte ich schon eine Empfängerin im Hinterkopf, die ich mit dem Begriff Vintage in Verbindung bringe.

Nun aber meine Beispielkarte:
Ich hab einen Bogen aus dem Vintage Paper Bloc 2 von Joy!crafts verwendet. Das Papier find ich sooo schööön, dass ich das Motiv gleich nochmal auf einen Bogen abgedrückt hab - erst in Gold, dann in Braun.
Unterlegt hab ich das Motiv mit einem Cheery-Lynn-Stanzteil unterlegt. Einige der Stanzen findet Ihr noch reduziert im Sale.
Den wundervollen Perlenschnörkel hab ich mir zurechtgeschnibbelt - ich find es klasse, dass die so vielseitig sind :)
Am Motiv hab ich etwas eingefärbte Spitze von Marianne Design angebracht und n Rand mit Frantage-Pulver in Aged Gold verziert.
Ich hoffe, meine Inspiration gefällt Euch :)
Habt einen wundervollen Tag!

Ganz liebe Grüße
Sabrina

Montag, 24. Juni 2013

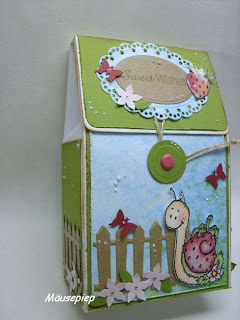
Sweet Wishes.......

Hallo Ihr Lieben
Wie schnell doch die Zeit vergeht, denn heute darf ich euch mal wieder etwas von mir zeigen.
Eine kleine Geschenktüte ist es dieses mal geworden.


Die Box habe ich auß weißem Cardstock mit dem X-cut Trimmer zugeschnitten und sie mit dem summer&late 04 Papier von Studio 75 beklebt. Zum bekleben verwende ich immer das doppelseitige Klebeband. Das hält super.


Die Papierränder habe ich wieder mit dem Paper Distresser verschönert. Mir persönlich gefällt es einfach besser, es wirkt nicht so hart.


Ein Kreis aus Cardstock mit einem Brad in der Mitte dient mir als Verschluss.
Das ganze rundherum mit verschiedenen Ausstanzungen und Blumen verzieren.
In meine Blumen klebe ich gerne als Blütenmitte ein kleines Straßsteinchen.
Probiert es doch mal aus, ihr werdet sehen es gibt ein kleines Highlight auf euren Karten. Meine Ausstanzungen habe ich aus Kraft Papier gestanzt.


Das Erdbeerschneckenhaus der kleinen Schnecke, habe ich noch mit Clossy Accents bestrichen es macht einen tollen 3D Effekt.
Fertig ist die Geschenktüte.

Ich hoffe ich konnte euch mit meiner Verpackung ein paar Inspirationen geben.

Viel Spaß beim Werkeln.

Ganz Liebe Mäusepiepsige Grüße Moni

Sonntag, 23. Juni 2013

Wundertüte


Hallo ihr Lieben
heute möchte ich euch einen Bagtopper zeigen den ich mit Washi Tape aufgepeppt habe.
Ich liebe diese tollen Papierkleberollen, denn man bekommt sie mit so vielen tollen Mustern.  
Punkte, Streifen, Blumen Texten und  und und....
Da ich Punkte liebe habe ich es heute mal gepunktet gepimpt :)
Noch ein kleiner Text dazu und fertig ist der Bagtopper den ihr dann nur noch mit ein paar netten Kleinigkeiten füllen braucht.


  Washi Tapes - white and black dots 

Samstag, 22. Juni 2013

zartes "Ja"

Hallo meine Lieben! Heute bin ich an der Reihe und ich möchte euch eine ganz zarte Hochzeits-Einladung zeigen. Und da man von diesen ja immer einige mehr braucht, ist es ganz praktisch, dass diese recht flott von der Hand gehen. Die Zutaten sind eine Feder, einen großen Schnörkel, z.B. von Couture Creations, einen der wunderschönes Label-Stanzen von Spellbinder und Transparentpapier. Ich habe die Buchstaben-Stempel noch mit dem traumhaft-schillernden "Cosmic Shimmer - Arctic Black"  embosst.


Ich hoffe, ich konnte euch ein wenig inspirieren, und wünsche euch noch ein schönes Wochenende! Bis zum nächsten mal mit liebsten Grüßen
Doris

Freitag, 21. Juni 2013

Post card

Hello everyone,
 
I made ​​this new project. And I hope you will be inspired by my Post card..
You can see that I love the colour pink.


I used the beautiful flowers from the shop.  I used a little distress ink for the card.
I painted my Rose with distress ink and used a water brush. 
Design paper that I used is from 13Arts  Collection Frosted Life.
Hope you will visite the shop and thanks for passing by.

Have fun and enjoy your day.
 Big hugs, Ilonka

         
 Pulse of Passion - zarte Blümchen, doppellagig, weiß mit Blätter        


Donnerstag, 20. Juni 2013

Summer Fun!

Hello everybody! 

I hope that everybody is well and that you have of weather so beautiful as here in Belgium!

Today, I come to show you a small card realized with the colorization in ink Distress as well as in chalks. Everything was colorized with the technique of the watercolor.
To realize this card, I used several falls of papers:

- Blue Bazzil Cardstock. 
- White polka-dot pink paper. 
- Paper " Pink Paislee ".

Papers are used with "Old Distresser" then sewn to the sewing machine.


I colorized my image in the following way: 

- Ink "Distress Tattered Rose" for the skin. 
- Ink "Distress Walnut Stain" and "Tea Dye" for hair and hat. 
- Ink "Distress Broken China". 
- Pink chalk. 
- Chalk blue. 
- Yellow chalk. 
- Pencil aquarellable green.


For the decoration, I added diverse flowers:

- Rose cremates (30 mm).
- Pink Rose (30 mm).
- Flower of pink cherry tree. 
- Flower of blue cherry tree. 
- White carnation. 
- Yellow Rose (10 mm).
- Pink Rose and cream (10 mm).
- Light pink Rose (10 mm).
- Rose blue (8 mm).
- White Rose (8 mm).

All the flowers are covered with some touches of "Glitter Stickels Icicle".

Finally, I added foliages which I realized with "Cuttlebug" and a dies " Toga " as well as small white leaves realized with a small puncher.


I thank you for your passage on the blog of the shop

I wish you all an excellent weekend! 


You can find following products in the shop:


    adhésif double face - 9 mm x 13 m  Stickles Glitter Glue IcicleTim Holtz distresser de papier et coupe-fil Distress Ink™ Stempelkissen Tattered Rose Distress Ink™ Stempelkissen Tea Dye Distress Ink™ Stempelkissen Walnut StainDistress Ink Stamp Pad ™ Forêt Moss  Flower Ribbons White Eau Petite Brosse Joycrafts craies / crayons de couleur - Lot de 3 6200-0201

Challenge #67 - Anything Goes

Hallo liebe Cards und More Freunde, wir haben heute wieder eine neue Challenge für Euch. Dieses Mal gibt es ein Board für euch, das euch zur...