Dieses Blog durchsuchen

Posts mit dem Label Kesi'Art werden angezeigt. Alle Posts anzeigen

Montag, 9. Oktober 2017

Der Eisbär lässt grüßen...

Hallo und einen schönen Montag Euch allen!
Hi and happy Monday!

Als ich den tollen Eisbär-Stempel von Woodware gesehen habe. war es sofort Liebe auf den ersten Blick. Auf den zweiten Blick dachte ich dann, der ist ja irgendwie ganz schön groß... Und auf den dritten Blick kam mir die Idee, dass der unbedingt etwas in seinen riesigen Pranken halten muss. Und so bin ich auf die Idee mit der Gutschein-Karte gekommen.
When I saw this fab polar bear stamp by Woodware for the first time, I fell in love immediately! When I took a closer look, I thought, oh my, it is a really HUGE stamp! And then I had the idea that the polar bear should absolutely use his huge paws to hold something - so I came up with the idea for a gift card holder.
Immer wenn ich so große Stempelmotive benutze, versuche ich sie irgendwie asymmetrisch zu platzieren, dann wirken sie nicht ganz so riesig. Und hier konnte ich dann die Pfote auch noch so schön über die Karte hinaus platzieren. Aber von vorne: Der HIntergrund ist mit Ranger Distress Oxides Salty Ocean und Faded Jeans gewischt, dann mit Wasser und weißer Dylusions Paint  besprenkelt. Das macht so einen schönen Schneeflocken-Effekt. Den Bär habe ich mit Memento Tuxedo Black gestempelt und mit Copic Markern coloriert, und dann die Nase noch mit Wink of Stella und Ranger Glossy Accents auf Hochglanz gebracht. Den Spruch habe ich mit Versamark ink und weißem Embossingpulver gemacht. Dann den Eisbär ausgeschnitten, schräg über Eck auf den Hintergrund geklebt und am Hintergrund-Panel entlang den Überstand abgeschnitten. Dann alles zusammen auf eine blaue Karte geklebt, und schließlich die Pranke mit Foam tape davorgesetzt.
Whenever I use huge stamps like this one, I try to position them in an asymmetrical way to make them look less giant. In this card I could place the icebear's paw even partially outside of the card for an additional eye-catcher. But let's start from the beginning: The background was created with Ranger Distress Oxides Salty Ocean and Faded Jeans, then sprinkled with water and white Dylusions Paint to achieve the look of fallling snow. I stamped the bear with Memento Tuxedo Black onto white cardstock and colored him with Copic Markers, then I embellished his nose with clear Wink of Stella and Ranger Glossy Accents.The sentiment was created with Versamark ink and white embossing powder. I fussy-cut the ice bear, glued him diagonally onto the background, then cut along the edges of the background panel. I glued the background panel onto some blue double-folded card and placed the paw with foam tape over the edge.

Für die Innenseite der Karte habe ich all das genauso nochmals gemacht, aber diesmal habe ich den Bär mittig platziert und etwa 1,5 cm oberhalb der Unterkante zwei halbkreisförmige Schlitze in das Hintergrundpanel geschnitten (das geht ganz einfach mit Hilfe einer 5 Cent-Münze). Dann habe ich beide Pfoten mit Foam Tape so positioniert, als würden sie den Gutschein halten.
For the inside, I followed exactly the same steps as for the front panel, but this time I placed the bear in the center of the page and cut two semi-circular slits about 1.5 cm from the lower edge (you can easily cut these slits with the help of a penny). The I placed both paws with foam tape as if they were holding the gift card.

Ich habe dann noch je ein Mini Tag aus hell- und dunkelblauem Karton gestanzt, den Spruch mit Memento Tuxedo Black darauf gestempelt, rotes Bäckergarn daran geknotet und am Hintergrund festgetackert.
I punched mini tags from light and dark blue cardstock with the and stamped the sentiment on the light blue one with Memento Tuxedo Black, then tied the two mini tags together with some baker's twine and attached them with a staple.

Nur noch in die Karte hineinkleben, Gutschein reinstecken - fertig.
Finally I glued the panel on the inside of my double-folded card and put the gift card into the slits - there you are.

Na, und was bekommt der Eisbär von Euch in die Pranken gedrückt?
So what are you going to put into the ice bear's paws?

Bis bald,
See you soon,

Christiane


Materialliste / Materials I used:


Creative Expressions - Woodware Clear Stamps Set XMas - Self Portrait Ranger - Tim Holtz Distress Oxide Ink Pad Salty Ocean  Ranger - Tim Holtz Distress Oxide Ink Pad Faded Jeans  Ranger Dylusions Paint | Acrylfarbe - white linen  Memento Stempelkissen TUXEDO BLACK  COPIC ciao Marker 72er Set A   ZIG Wink of Stella Brush Clear Glitter MS-55/999  Ranger Glossy Accents  Tsukineko VersaMark Emboss Ink Pad clear - Embossing Kissen transparent MBoss Embossingpowder | Embossing Pulver - White   3D Foamtape - 2 m Rolle, 1 mm dick GARN & MEHR Bäcker-Garn rot  Kesi'Art MétaliKs - Stanze - Tags

Dienstag, 25. Oktober 2016

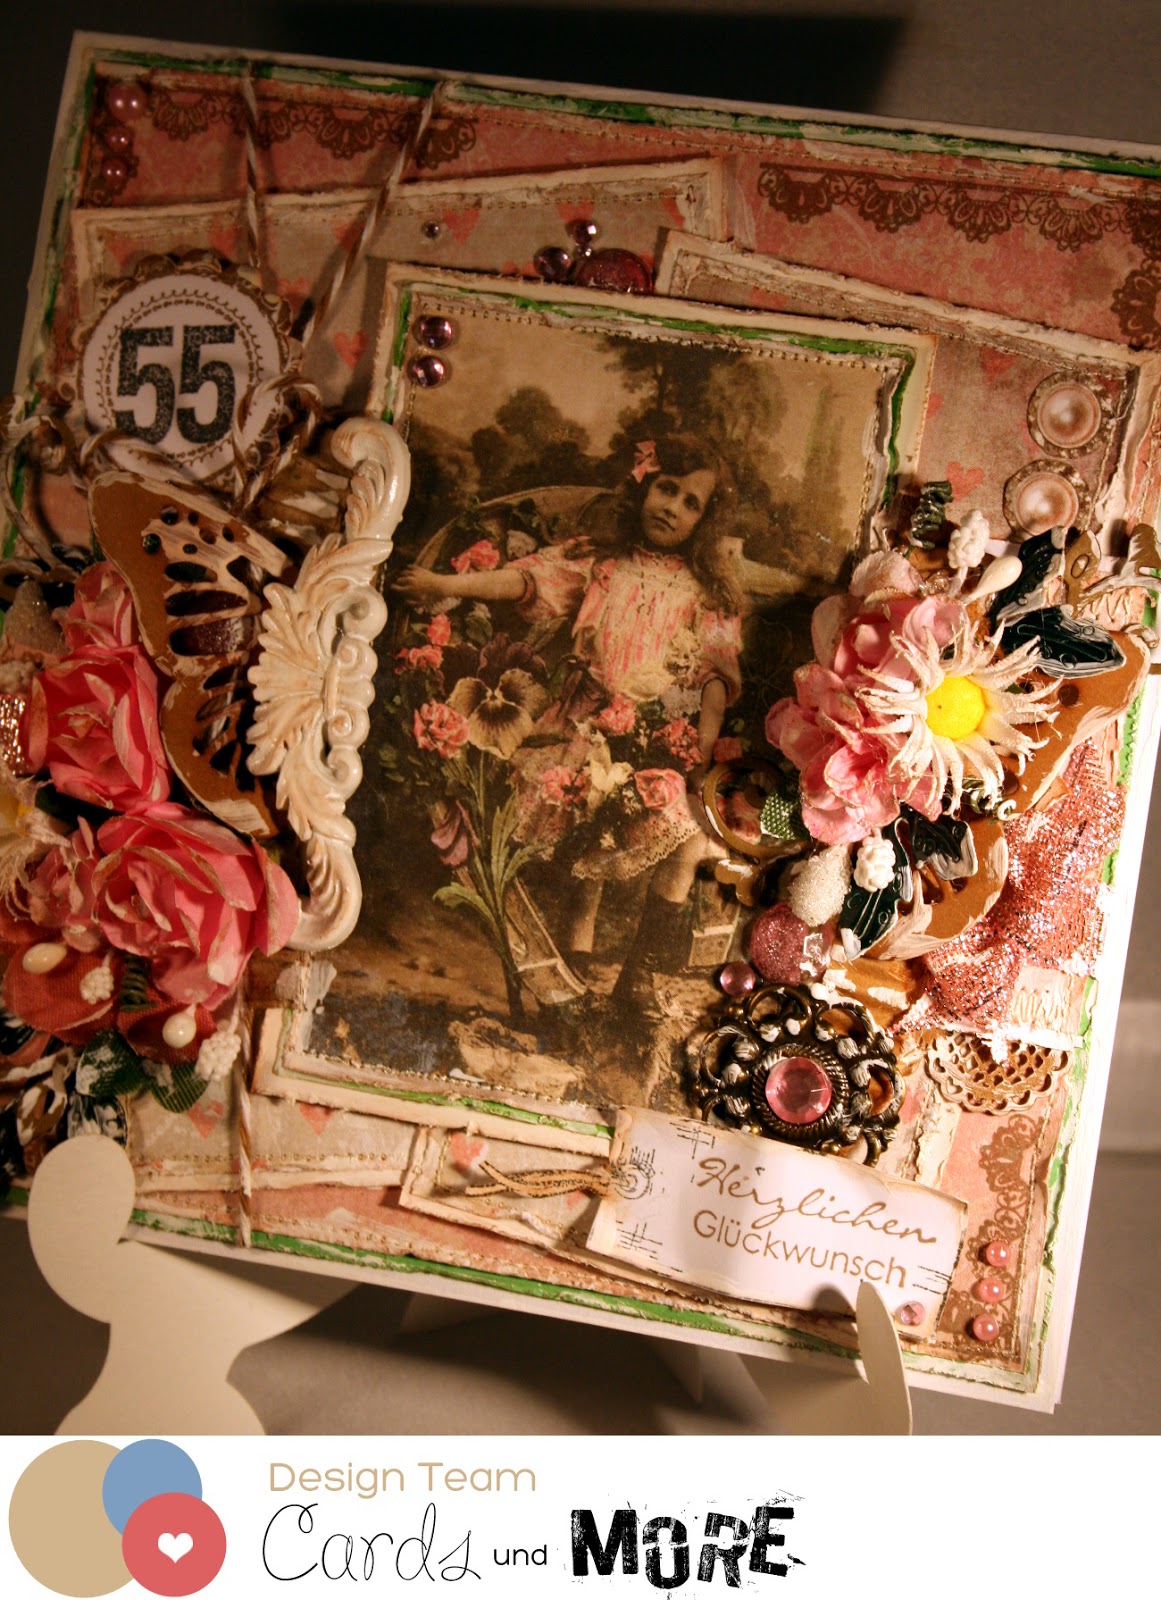
Birthday Card for my Mom's 55th Birthday

Hallo!
Einen schönen Dienstag euch allen!
Heute zeige ich euch zum aller letzten Mal ein Design Team Projekt von mir und mich ganz herzlich für die tolle Zeit hier bedanken. Es hat mir sehr viel Spaß gemacht mit so vielen lieben und kreativen Damen zu arbeiten und euch regelmäßig mit Inspirationen zu versorgen. Meine letzte Karte ist für meine Mutti entstanden. Sie wird dieses Jahr 55 und ich habe für sie eine verspielte und mädchenhafte Fotokarte mit einem der tollen Studio Light Motiven gebastelt.

Ich wünsche dem neuen Design Team eine schöne Zeit, viel Erfolg mit dem Shop und weiterhin ganz viele kreative Ideen für die Leser des Shop Blogs.
***
Hello and a great Tuesday to you!
Today is my last time to show you a Design Team project from me. I had a great time in this team and it was a pressure to work with such awesome and creative girls. It was fun to show you my projects and to inpire a lot of you out there. My last card I made for my mom's 55th birthday. I made it romantic and girly using a photo image by Studio Light.

I wish the new Design Team a lovely time, sucess with the Online Shop and a lot of creative ideas for the readers of this Shop Blog.

Und so schaut meine fertige Grußkarte aus:
***
This is how my finished card looks like:
 

 verwendete Materialien/used stash:
http://cards-und-more.de/images/product_images/popup_images/5099_0.jpghttp://cards-und-more.de/images/garnundmehr/wurstgarn_bg-00003.jpghttp://cards-und-more.de/images/lse/R0056006.JPGhttp://cards-und-more.de/images/product_images/popup_images/6003-0046_voorbeeld.jpg
http://cards-und-more.de/images/product_images/info_images/dutch-doobadoo-dutch-craft-art-a5-party-borders.jpgScrapBerry's Adhesive pearls 120pcs/4 colors, Kids’ Fun 2http://cards-und-more.de/images/product_images/popup_images/1307.jpg
http://cards-und-more.de/images/product_images/popup_images/4874_0.jpgStudio Light - MDF Cupcake incl. Papierset Shabby Chic
 
Ganz liebe Grüße und man sieht sich!
***
Lovely wishes and see you! Bye, bye!

Mittwoch, 25. Mai 2016

Explosions Box zur Konfirmation - explosion box for Confirmation

Hallo und einen schönen Mittwoch euch allen!
Heute möchte ich, Natascha, euch ein neues Projekt von mir zeigen. Dieses Mal habe ich mich beim Basteln mitgefilmt und wer sich die Zeit nehmen möchte, kann sich die Entstehung meiner Explosionsboxen auf Youtube anschauen. Achtung! Das Video ist sehr lang. Aber ihr könnt ja die uninteressanten Stellen einfach vorspulen ;)
***
Hello and a lovely Wednesday to you all!
Today it's my, Natasha's turn, to show you a new project made by me. I took a video while crafting my explosion boxes and if you like to watch it and have some time you can watch it on Youtube. It's completely in German but you can see what I am doing. Attention! The video is very long. Push fast forward to skip not interesting parts ;)

Für alle, die sich lieber Fotos anschauen, habe ich auch was mitgebracht :)
***
You like to see photos? Here you are :)

 Und für alle, die das Video auch sehen möchten, schauen gerne hier:
***
Here is the video I mentioned above:

 Verwendete Materialien:
***
Used meterial:
http://cards-und-more.de/images/product_images/thumbnail_images/6002-0359.jpghttp://cards-und-more.de/de/STANZEN---Stanzschablonen/Kesi-Art-M-taliKs/Kesi-Art-M-taliKs---Stanze---Papillons.htmlhttp://cards-und-more.de/images/product_images/info_images/6003-0046_voorbeeld.jpg

http://cards-und-more.de/images/product_images/info_images/6410-0338_voorbeeld.jpghttp://cards-und-more.de/images/product_images/original_images/6002-0386_voorbeeld.jpghttp://cards-und-more.de/images/product_images/info_images/68_0.jpghttp://cards-und-more.de/images/91990.jpg


Vielen lieben Dank fürs Vorbeischauen und bis bald,
eure Natascha
***
Thank you very much for stopping by and see you again soon,
Natasha

Challenge #67 - Anything Goes

Hallo liebe Cards und More Freunde, wir haben heute wieder eine neue Challenge für Euch. Dieses Mal gibt es ein Board für euch, das euch zur...