Dieses Blog durchsuchen

Posts mit dem Label magnolia werden angezeigt. Alle Posts anzeigen

Samstag, 20. Dezember 2014

Valou - "Love Card"

Hello everybody! 

Valou here for the inspiration post today.


Here is in images!


I used some paper "Bazzil Cardstock Vanille" and papers "Action". Papers are worn out with "Old Distresser" and inked to the ink "Distress Walnut Stain".

Then, I added a die-cut realized with a dies " Noor! Design ", " Round 2 ". I also inked it to the ink "Distress Walnut Stain".

Around the polka-dot paper, I stuck two die-cuts " Border - Butterflies " realized with a dies " Noor! Design ". I embossed them with some powder " Frantage - Shabby White ".


I colorized it in the following way: 

- Ink "Distress Tattered Rose" and "Distress Vintage Photo" for the skin.
- Ink "Distress Antique Linen" and "Distress Walnut Stain" for hair.
- Ink "Distress Mowed Lawn".
- Ink "Distress Picked Raspberry".
- Ink "Distress Spun Sugar".
Ink "Distress Pumice Stone".

Under the image, I stuck two die-cuts:

- Die-cut realized with a dies " Spellbinders-Nestabilities - Majestic Ovals " that I have gaufré with a file " Provocraft-Peas ".
- Die-cuts "Bricks" that I realized with a dies " Noor! Design " and inked with some ink " Distress Walnut Stain ".


For the decoration, I added the following embellishments:

- Flowers realized with a dies " Magnolia Ink " as well as leaves.
- White and pink Rose (30 mm) (WOC).
- Flower of cherry tree white (WOC).
- Pink Rose (20 mm) (WOC).
- White and blue Rose (20 mm) (WOC).
- Pink snowballs (WOC).
- Rosebuds (WOC).
- Die-cut " Swirl " realized with a dies "Marianne Design".


Under the image, I stuck of the white lace and the ribbon " Vichy Blue ". Then, I stuck a double-knot which I realized with the ribbon " blue Organza " and which I decorated with one " pink Lilidaft " and a charm "Love".

Here we are! I hope that my realization has you more and that it will inspire you.

I thank you for your passage and wish you an excellent day! Bye for now!

Hugs, 


Samstag, 6. Dezember 2014

Valou - "An Advent Calendar"

Hello everybody! 

Valou here for the inspiration post today. Today I share with you an "Advent Calendar".


To realize this set, I used the file of "Snap Dragon Snippets".

All the parts are cut with the machine " Silhouette Studio ".

I used the following papers:

- White Bazzil Cardstock.
- Papers " Winter Collection " and "Spring Collection".
- Blue paper "Action".
- Cardboard of recycling.
- White Bristol.
- Cardstock chestnut.

Any goshawk, I added barriers cut with the " Silhouette Studio ". Then, in front of, I stuck dies-cuts realized with a dies " Noor!Design ", "Border Snowflakes".

Finally, I stuck of the ribbon " Organza Mahogany " and I finished with a small knot.


To the left of the house, I decided to make an extension to realize the garden.

All the bottom is covered with artificial snow in spray.

I realized an ice rink with a die-cut realized with a dies " Noor! Design ", " Round 2 ".


I realized a tree with a file of cut " Silhouette Studio Store". Above, I added a little artificial snow and diverse blue, pink and white pearly pearls to represent Christmas baubles.

I also added a wooden "Treillis" of the shop " HobbyCutz ". Above, I stuck some pearly pearls as well as some flowers: white Poinsettia, blue Poinsettia, white and red Rose ( WOC), white Rose ( WOC), blue Rose " Kaisercraft " and spangled red berries. At the foot of this "Treillis", I stuck a silvery and spangled pine cone, a cloth white rose, a red "Lily" and a spangled red berry.


Then, I added a small glass sled. Above, I stuck a red flower.

For the rest, I added a reindeer cut with "Silhouette Sutdio" and die-cuts "Fir trees".

On the ground, I stuck some white balls spangled in polyester.


I used several rubberstamps " Magnolia Ink ".

I colorized them with the following ink:

- Ink "Distress Tattered Rose" and "Distress Vintage Photo" for the skin.
- Ink "Distress Antique Linen", "Brushed Corduroy" and "Distress Walnut Stain" for hair.
- Ink "Distress Fayded Jeans".
- Ink "Distress Aged Mahogany".
- Ink "Distress Pumice Stone".
- Glitter Stickels Diamond.


On the roof, I added pieces of garland, some artificial snow and a small wooden cock.


On the window of the top, I added a knot realized with a piece of ribbon " Organza Mahogany " and decorated with a white rose (15 mm) ( WOC).

I added a small banner realized with a dies " Noor! Design " on whom I stuck "Rub-On", "Merry Christmas". I inked it to the ink "Distress Walnut Stain".


For the rest, I added various embellishments:

- Spangled and silvery pine cone.
- Spangled red embellishment.
- Wooden embellishment (received in present in a magazine).
- Plastic ax (recycling).

Have a lovely day! 

Kiss


Samstag, 20. September 2014

Valou - "Easel Card for a child"

Hello everybody ! 

This morning, I come to show you a sweetly card ! 


I used some paper " Magnolia Ink ", "Sweet Crazy Love", some paper " white Bazzil Cardstock " and some paper " pink Bazzil Cardstock ". The edges of the printed paper are inked to the ink "Distress Walnut Stain".
 

I colorized it with the following ink " Distress ":

- Ink "Distress Tattered Rose" and "Distress Vintage Photo" for the skin.
- Ink "Distress Picked Raspberry" for hair.
- Ink "Distress Salty Ocean".
- Ink "Distress Mowed Lawn".


Everything around the image, I added peas which I realized with "Liquid Pearl", "White Opal".


Then, I stuck a white rose (30 mm), two "Lilies" turquoise blue, two pink "Lilidafts", two rosebuds whites and rosebuds two "Rust". The leaves were cut with the silhouette Studio from some paper " green Bazzil Cardstock ".


On the bottom of the card, I added some ribbon "Muslin" white. Above, I added my title realized with two dies " Spellbinders-Nestabilities - Majestic Ovals " and a clear stamp " Penny Black " (ink Versafine " Onyx Black ").

To finish, I stuck a white rose (30 mm), pink "Daisy" and turquoise blue "Lilidaft".

I cut butterflies with dies " Joy! Craft " and I decorated them with half a white pearly pearl.


See you very soon for a new project!


You can find the material in the shop " Cards Und More "


Sonntag, 13. April 2014

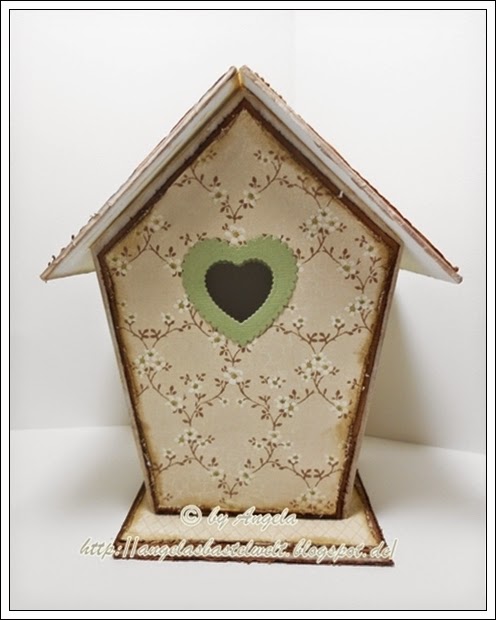
♥ Vogelhaus im Frühlings Look ♥

Hallo Ihr Lieben,
einen wunderschönen Sonntag wünsche ich Euch und freue mich sehr,dass Ihr auch heute wieder hier auf dem Shopblog von Cards und More vorbei schaut.
Heute bin ich (Angela) wieder an der Reihe,um Euch ein Werk mit den schönen Produkten aus dem Cards und More Online Shop zu zeigen. Habt Ihr übrigens schon das neue Design gesehen? Also mir gefällt es total gut und ich bin ganz begeistert.Schaut unbedingt mal vorbei (auch unbedingt unter den Neuheiten schauen) und sichert Euch Eure Lieblingsartikel.


Ich möchte Euch heute eine Frühlings Deko zeigen, und zwar habe ich  ein Vogelhäuschen gestaltet.
Die liebe Dunja hatte mir zu Weihnachten unter anderem ein Bastelpaket für ein MDF Vogelhaus geschenkt.Die ganze Zeit habe ich überlegt,was ich damit mache.Nun habe ich mich also endlich mal ran getraut und habe eine kleine Frühlingsdeko gewerkelt.
Da mir die Idee eigentlich so gut gefällt,habe ich natürlich nicht das Original verwendet(das behalte ich als Vorlage),sondern habe alle Teile aus Graupappe geschnitten und mit Gesso angestrichen.
Nach dem trocknen habe ich dann alle Papiere zurechtgeschnitten,die Ränder mit dem Paper Distresser aufgeraut und mit Distress Walnut Stain eingefärbt.
Das schöne Designpapier von Pion Design aus der A Day in May Serie passt meiner Meinung nach perfekt,zu meiner Frühlings Deko.
Zusammengeklebt habe ich alles mit einem Bastelkleber und so sah mein Häuschen vor der Dekoration aus.
Für die Dekoration habe ich diverse Stanzen verwendet ,unter anderem auch die Vintage Flourish Blume 4 von Joy!Crafts.
Die Motive habe ich zum Teil mit den Distress Farben koloriert und anschließend ausgeschnitten.
Und hier ist nun das fertige Vogelhäuschen. Für die Vorderseite habe ich zwei neue Magnolias verwendet,die ich nach dem ausschnippeln mit 3 D Pads aufgeklebt habe.
Die beiden Seitenteile habe ich gleich gestaltet.
Oben an der Dachkante habe ich die schöne Spitze von Marianne Design verwendet und die Wimpelstanze von La-La Land Crafts.
Die Vintage Flourish Blume 4 habe ich nach dem ausstanzen auch mit Gesso und Distress Walnut Stain eingefärbt und mit kolorierten Magnolia Blümchen dekoriert.Auf die kleinen Schmetterlinge konnte ich natürlich nicht verzichten und habe sie mit kleinen Halbperlen verziert.
Auf der Rückseite habe ich ebenfalls noch Motive von Magnolia mit 3 D Pads angebracht.
Ich hoffe meine Frühlings Deko gefällt Euch und ich konnte Euch ein wenig inspirieren.Mir hat es übrigens viel Spaß gemacht,dass Häuschen zu werkeln und es werden bestimmt noch mehrere folgen.
Nun wünsche ich Euch noch einen schönen Sonntag und lasst es Euch gut gehen.
Tschüssi und bis bald
Folgende Materialien habe ich aus dem Cards und More Onlineshop verwendet:

http://www.cards-und-more.de/Cards-und-More--Sandersdorf--Basteln--Designpapiere--Papier--Maja-Design--Majadesign--Vintage-Papiere--Pion-Design--Styroporkugeln--Styroporeier--Styroporfiguren--Pailettentechnik--Styropor-basteln-739/Joycrafts--Cutting--and-Embossing-Stencil--Cards-und-More--Schneideschablone--Stanzschablone--Embossingschablone-5438-5443-5445-5446-5458-5460-5461-5462.html http://www.cards-und-more.de/PAPIERE/PION-DESIGN/Pion-Design---A-DAY-IN-MAY---Apple-Blossom.html http://www.cards-und-more.de/PAPIERE/PION-DESIGN/Pion-Design---A-DAY-IN-MAY---Blooming-Branches.html http://www.cards-und-more.de/PAPIERE/PION-DESIGN/Pion-Design---A-DAY-IN-MAY---Writings.html http://www.cards-und-more.de/SPRAYS---FARBEN/13-rts-Gesso-u--Modellierpaste/13arts-Ayeeda-Gesso---200ml-Acryl-Grundierung.html

http://www.cards-und-more.de/STANZEN---Stanzschablonen/Joy-Crafts/Joy-Crafts-Stanzschablone-Vintage-Flourishes-Blumen-4-6003-0032.html Tim Holtz® Distress Markers Thttp://www.cards-und-more.de/EMBELLISHMENTS---DEKO/Strasssteinchen/Rhinestones---Pearls---Rosa---Weiss--855-Stueck-.html http://www.cards-und-more.de/STEMPELFARBE---ZUBEHOeR/Stempelfarbe/Distress-Ink--8482--Pads/Distress-Ink--8482--Stempelkissen-Walnut-Stain.html http://www.cards-und-more.de/EMBELLISHMENTS---DEKO/Tim-Holtz-Accessoires/Tim-Holtz-Paper-Distresser-and-Thread-Cutter.html http://www.cards-und-more.de/ALLES-WAS-KLEBT/Klebepads/3D-Foam---1-9-mm-dick---5x5mm-Klebe-Pads.html 

Challenge #67 - Anything Goes

Hallo liebe Cards und More Freunde, wir haben heute wieder eine neue Challenge für Euch. Dieses Mal gibt es ein Board für euch, das euch zur...