Dieses Blog durchsuchen

Mittwoch, 28. Mai 2014

Marta Our Guest Designer - Inspirational Tag

Hello everyone :)
Today is my last day with you. I created something very special to say goodbye.
I hope my tag will inspire you to create and that you will enjoy this journey.
To create this tag I used several mix media techniques.
I have used modelling paste and great SpiderWeb stencil.
Then I painted all with paints and sprays.


I added stunning Pulse of Passion Flowers


Here you can see how well the Sprider Web stencil presents.


Materials used:
- Spider Web Stecil
 Pulse of Passion - Kirschblüten, weiß

On this note I will say goodbye. Thank you so much for having me here, it was my great pleasure and honour. Hope to see you soon. Let's create !

Love,
Marta xx
http://artistycrafty.blogspot.ie/


Dienstag, 27. Mai 2014

Two cards

Hi friends!
Irena here, today is my first post on the blog Cards Und More. I hope you are having a wonderful day! 
Today I made a two cards - any other.
I have used Studio Light Paper Pad PP SL 08
The first card is simple, with little decoration. The main element - a beautiful butterfly with 
The second card is made from the same set of papers in vintage style.
 Sentiment is printed.
Thanks for stopping by to see what we are up to!!
Have fun crafting...
Hugs from Poland, 

 
 I used from Onlineshop Cards Und More

http://www.cards-und-more.de/STANZEN---Stanzschablonen/NOOR-Design/Noor-Design-Schneide---Praege-TAG-No--2.html  http://www.cards-und-more.de/PAPIERE/Studiolight/Studio-Light-PAPER-PAD---15-x-15-cm---PP-SL-08.html   http://www.cards-und-more.de/EMBELLISHMENTS---DEKO/Melissa-Frances-Artikel/Melissa-Frances---Beautiful-Butterflies--4-tlg--.html    
http://www.cards-und-more.de/EMBELLISHMENTS---DEKO/Lace--Ribbons--Kordeln/Baender---Ribbons/Crispy-Ribbon-white---Crispy-Band-weiss.html


Sonntag, 25. Mai 2014

♥ Geschenkbox Vogelhäuschen mit Anleitung ♥

Hallo ihr Lieben,
schön, dass ihr wieder hier auf dem
Cards und More Shop Blog
vorbeischaut.

Heute möchte ich (ScrappyAndrea) euch zeigen, wie ihr diese Geschenkbox im Vogelhäuschen-Look mit den Produkten aus dem
Cards und More Shop
werkeln könnt:


Ihr benötigt:
- Vorlage (am Ende des Posts)
- ein Stück Card-Stock in der Größe A4
- Stanze für die Öffnung
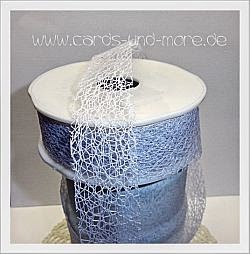
- Windradfolie
- Design-Papiere
- Schere
- doppelseitiges Klebeband
- Dekorationsmaterial

Druckt euch die Vorlage auf A4 aus, um eine Schablone daraus zu erstellen. Diese übertragt ihr dann auf euer Card-Stock. Ich habe mich für Kraft Cardstock entschieden. Dann schneidet ihr das Vogelhäuschen an den vorgesehenen Linien aus. Anschließend werden die Linien, die zum Falzen sind, gefalzt:


Nun könnt ihr auf einer Seite eures Vogelhäuschens noch die Öffnung ausstanzen. Ihr könnt jede Form benutzen, die ihr mögt. Ich habe mich bei diesem Häuschen für einen Kreis-Schablone von Spellbinders  entschieden.
Da mein Häuschen einen Vintage-Look bekommen soll, habe ich alle Ränder mit Distress Ink Walnut Stain gewischt. Nun wird das Vogelhaus mit Design Papier bezogen. Ihr könnt jedes Design-Papier benutzen, welches ihr mögt. Ich habe mich für Maja Design entschieden. Auch diese Ränder habe ich gewischt und mit der Nähmaschine habe ich noch ein paar Nähte gesetzt:


Nun wird mittels doppelseitigen Klebeband die Windradfolie hinter die Öffnung geklebt. Dann solltet ihr euch noch überlegen, wie ihr euer Haus verschließen wollt. Ihr könnt Magnete benutzen, oder so wie ich 2 kleine Löcher stanzen (z.B. mit der Crop-a-dile) um sie anschließend mit einem Band zu schließen. Wenn ihr das erledigt habt, klebt ihr mit doppelseitigem Klebeband euer Vogelhäuschen an den vorgesehenen Stellen zusammen. Nun sollte es so aussehen:


Und nun kommt das schönste: das Dekorieren :-)
Dort könnt ihr euch nach Herzenslust austoben.

Fertig sieht mein Haus so aus:


Und hie noch ein paar Detail-Fotos:


Ich hoffe, euch hat die kleine Anleitung gefallen und ihr habt auch Lust bekommen eine kleine Geschenkbox im Vogelhäuschen-Look zu werkeln.
Hier ist die Vorlage für das Haus:


Liebe Grüße
Andrea

Diese Produkte habe ich aus dem Cards und More Shop benutzt:


Samstag, 24. Mai 2014

Valou - A Spring's card


Hello everybody ! 

This morning, I come to show you a lovely Spring's card! 


To realize this card, I used a paper "Bazzil Cardstock Piglet" and a paper " Joy! Crafts " (small block).

On the bottom of the card, I stuck of the ribbon on flowers pink.

In the corner top-left, I added a die-cut realized with a dies " Noor!design ", " Rund 2 ".


I used an image " Lia Stampz " of "Whimsy Stamps".

I colorized it in the following way: 

- Ink "Distress Tattered Rose" and "Distress Vintage Photo" for the skin. 


For the rest of the decoration, I added the following flowers:

- Big pink rose (30 mm).
- Big turquoise blue rose.
- Cloth white Rose.
- Pink Rose (20 mm).
- White poppy.
- Brunette Lilidaft.

Some are covered with some touches of "Glitter Stickels Frosted Lace".

See you very soon for a new project!


You can find the material in the shop " Cards Und More "


Challenge #67 - Anything Goes

Hallo liebe Cards und More Freunde, wir haben heute wieder eine neue Challenge für Euch. Dieses Mal gibt es ein Board für euch, das euch zur...